
I couldn't help myself, and immediately started assembling the rifle. I didn't have time to completely finish, but did pull off the front sight housing/gas block, removed the unnecessary triangular handguard cap, and replaced the barrel nut with the special one that came with the handguard. The most difficult part of this process was removing the pins for the sight housing/gas block. All of the guides I'd gone though had tapered pins, but RRA uses dowel pins on their equipment. Once I got that figured out, the pins were easy enough to punch out, and then everything slid right off.
I got the barrel on just tight enough to stay put and threaded on the handguard and sight housing/gas block to get a look at it and a feel for it. It was quite satisfying to feel the heft and solidity of the gun, even when not completely assembled. That's all I had time for, so headed back to work and wait for the day to be over.

At the end of the work day, I rushed home and immediately started the rest of the assembly. I started by pulling the upper receiver off and sticking it in the upper action vise block (money well spent) and tightening down the barrel nut. Most sources I've found recommend 30 pounds of torque plus whatever it takes to get the holes in the nut aligned to allow the gas tube through into the receiver. Most sources I've found say 30-40 pounds should be about right, and that about 30 pounds of torque is optimal for best accuracy. The guide that came with my handguard recommends 35 pounds. Unfortunately, the holes don't line up on my barrel nut between 30 and 40 pounds of torque. I found that it was either 12 pounds or 50 to get the holes to line up, so I went with 50. I did a little more googling, and it seems 50 pounds is within acceptable range for the barrel nut, so all is OK.
I then threaded on the handguard, got it aligned, and tightened down the nuts that clamp it in place. Next came one of the more tedious parts of the build: pinning the gas tube into the sight housing/gas block. This is a roll pin, and is quite difficult to get started. I see why Brownells makes a front sight bench block to work on these kinds of things, as keeping the sight housing stationary on a flat surface while tapping in the roll pin is quite challenging. It took me quite a while to get the pin started, but getting it fully seated after that was a cinch.
Once the gas tube was attached, I slid the sight housing/gas block and on and got things aligned. Next up was to re-pin the sight housing/gas block. This was a bit of a challenge, and I ended up setting the upper on the floor and putting the sight housing on top of a 2x4 I had handy, then carefully tapping the dowel pins back in. Again, the front sight bench block from Brownell's would have made this much simpler. Once this was done, I installed the front sight detent/spring and post. This is very straightforward - just put the spring and detent in its little hole, then thread the sight post into its hole. Once the post starts hitting the detent, use a sight tool to screw the post down further until it's flush in the housing.
Next up was the flash hider. This is pretty straightforward to install. Brownell's video on this is quite helpful. I got the flash hider on hand-tight against the crush washer, and then rotated it about 270 degrees until it was aligned correctly. This was by far the easiest part of today's assembly. My AR wrench actually has a slot specifically for this, so no new tools were required.
The last and most tedious part of assembly was the sling swivel. as simple as this sounds like it should be, there's very little room to get a backing on the rivet in order to mushroom it with a punch on the other side. I tried several different methods, and what I ended up doing to get it to work was gingerly place the back of the rivet on the corner of my vise jaw, to give it as solid base. I hammered away at the top end of the rivet, and it mushroomed up nicely. Oddly enough, the Brownell's videos don't specify how they back the rivet, and whatever they use is not shown in the video. I'd be curious to hear how other folks accomplish this.

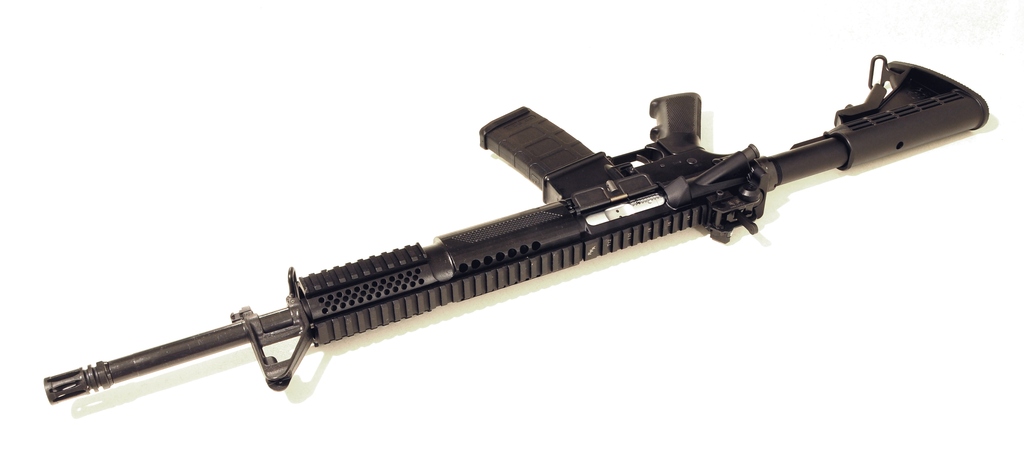
And so, my rifle is complete! I won't be able to get to the range until Sunday, but that will give me time to get it lubed up and to check it with the headspace gauge.
This has been an exciting process, and I'm very glad that I went the build route for my first AR. I'm quite satisfied with how the gun has turned out, and am itching to get her to the range. I should have a range report for you in the next couple of days.


Well done! Looking forward to a range report!
ReplyDeleteGood looking rifle. I too am looking forward to a range report.
ReplyDeleteNice! You need something nicer than the stock AR grip though. Give the Tango Down grip a try. Bonus is storage for batteries.
ReplyDeletehttp://tangodown.com/shop/product_info.php?cPath=21&products_id=31