Thursday, December 16, 2010

Awesome New Photo Tool - Hugin

I was trying to find a solution for a coworker today, getting a wide area of the office into a single photo. This was a daunting task, as the area needed to be covered was around 100 feet wide and only about 40 feet deep. I figured I could perhaps stitch several photos together and make a panorama. As you may know, I do not use Windows or Photoshop. I kicked the Microsoft habit back in 2oo1, and haven't looked back since. I use Linux exclusively as the platform for all of my computing needs, though I will occasionally utilize my wife's OS X desktop for the sake of convenience (it is the only desktop system in the house at present time).

I'd researched photo stitching software a few years back, and only found complex and inadequate guides to sortof putting photos together with The GIMP. I use The GIMP as my primary post-processing and editing program, and am quite happy with its performance. For the uninitiated, it is full-featured photoshop workalike with active development. It is open-source and it is free. Check the link above for more info.

However, this post is not about The GIMP. I took my photos and set about finding a way to stitch them together for my coworker. A short Google search brought me to Hugin. I run Debian Linux, and Hugin is included in the standard repositories. I installed the application with its requisite dependencies and suggested optional related packages. The entire install footprint ended up at a mere 60MB. I ran through the steps presented to me by the program, and waited a few minutes for it to process the images (five 12 megapixel images from my Nikon D90). The results were astounding. This application is so well-developed that I had an incredibly impressive image in TIF format in a matter of 5 minutes, and there was nothing manual about the process.

I got to my usual coffee shop this evening, and thought I'd play a bit with some 30 second time exposures of the outdoor porch area. I wanted to see how Hugin handled this, given the differences in exposure and color temperature in such an environment, as well as knowing that the darker shots were underexposed due to the limitations I imposed on the camera when capturing the images.

Here are the images I started with, scaled down to 1024 pixels wide (if you click on them) for your viewing pleasure:


I simply dumped these photos into Hugin for processing, and out comes this, after about 3 minutes on my single-core not-current-technology laptop:

The photo (if you click it) has been scaled to 2048 pixels wide and converted to png format, but otherwise no post-processing has been done. The resulting TIF image was 5989x2037 pixels.

This is one impressive piece of software. There are many options that I haven't taken a look at yet, but this is what it produces out of the box, choosing the "photometrics" (which I believe evens out the exposure) and "difference" blend mode. Kudos go out to all of the developers of this software. This has got to be one hell of a project to get such a complex piece of software working so elegantly.

Check out the project page at:

http://hugin.sourceforge.net/

This is cross-platform software, and there are releases available for Windows, Mac OS, Linux, and FreeBSD. If you find this software as incredibly useful as I do, consider making a contribution to the project. There is a small link at the bottom of the home page for PayPal donation.

Wednesday, December 15, 2010

Brief Range Report - Winchester Q3131A1

A couple of months ago, I bought some Winchester 5.56 ammo at Cabela's to try out in the new rifle. It was on sale for $9.99, so I figured I'd pick up several boxes. I'd kept it in the range bag the first session I took the rifle out.

I decided to see how it performed the next session (in late November), and was pleasantly surprised at the vast improvement in my group sizes from the AE223. I'd shot a couple of targets using the AE223 at the beginning of the session, and was less than impressed at the grouping I got. Shots were all over the target. I certainly could attribute some of this to my ongoing issues with shooting iron sights against black targets, but they still didn't seem to reflect the consistency of my sighting. It was so bad, I didn't bother keeping or taking photos of the targets.

I loaded up some of the Winchester rounds and put 10 rounds through one of the targets that I was shooting with the AE223, and saw an immediate improvement. I loaded up a full mag of 30 and put 3 shots through that same target, then decided to move on to a fresh target, pictured below.


Excluding the two fliers at 1:00 and 9:00, that is a 1.5" wide and 2" tall grouping. This ammo seems to shoot *very* well in my rifle, certainly better than my ability to keep the rifle steady on target. On that subject, I just purchased a sling for the rifle, which should vastly improve my ability to steady my shots and improve my consistency. Just trying out the sling at home, I can tell a significant improvement in my ability to keep the rifle steady. I look forward to using it at the range this weekend.

I've also been able to work out both the plinking and hunting rounds mentioned in my last post. I've loaded up 200 of the plinking rounds using Winchester 55 grain FMJ-BT bullets, so I can see how well they run in numbers. I've got 50 rounds of the hunting load using the Speer 70 grain semi-spitzer soft point, to get a good feel for the load and its characteristics at different ranges. It looks like I won't get a hog hunt in this year, but an early 2011 hunt is possible. Hopefully, I'll get to put this load to some practical use in the near future.

Hopefully, I'll have something new to write up for you after the weekend.

Sunday, November 14, 2010

Rolling My Own...

I've been meaning to get a reloading post up for almost a year now. I just happened to be working up some .223 loads for the AR, so now seemed as good a time as any.


My reloading journey started 11 months ago, when I was given a Lee 50th Anniversary reloading kit by my mother-in-law as a Christmas Gift. I'd been working towards getting into reloading for some time, but had never got around to getting outfitted yet.

I started my foray into reloading with 9mm, as that's the caliber I get the most range time with. I've since developed several loads, using Blue Dot, Power Pistol, and Titegroup.


With .380 so difficult to find and expensive when you did find it last year, I decided that .380 would be a great way to save some serious money reloading. I've found, using recovered brass, that I can put together a box of 50 rounds of .380 for $5.84 in component cost. It's a great thing to not be held hostage to the poor selection and high prices of factory-loaded .380. If I need .380, I can simply load some up and have it ready whenever I need it. Not only that, but I've been able to tune my loads for accuracy, and am able to make groups I never thought possible out of my Ruger LCP.


Today was my first time reloading rifle cartridges. This is a somewhat more involved process than loading handgun rounds. Case lube is required for resizing, powder is manually funneled into each case in the loading tray (there is no expanding die to put the powder through with rifle rounds), and bullet seating is a little more tricky if you're not using boat-tail bullets.


I managed to get two sets of loads worked up, one as a standard 55 grain FMJ-BT plinking round, where I'm going strictly for accuracy. The other is a hog/deer hunting round, built with the Speer 70 grain Semi-Spitzer. I'll have to see how these run through the AR, as it has a 1:9 twist rate. From my reading on the subject, this may or may not be enough to stabilize a 70 grain bullet. The Speer website claims 1:10 or better is sufficient for stabilizing this bullet, so I think I should be good to go. We'll see when I try them out.

If all goes according to plan, I'm going to hit up the range tomorrow with the chrony in tow and see how these loads run. Hopefully, I'll have an update for you tomorrow night with the results.

Monday, November 1, 2010

AR Build - Range Report

After successful completeion, I took the AR out for its inaugural range session yesterday. I went to Best of the West Shooting Sports in Liberty Hill, the same range used for the LaRue Tactical range day event earlier in the month. The short-range rifle spots are 50, 100, and 250 yards. I wanted to zero the rifle for 200 yards, and 50 yards is at about the upward trajectory intersection of zero for a 200 yard zero AR, so I decided to run at that range. Unfortunately, all of the 50y target boards were in use, so I hung around and talked to the Range Officer and some other guys having a conversation until some space cleared out.

Finally, space did clear up, and I stapled up 3 8-inch "Dirty Bird" targets in a vertical row. I loaded up some of the American Eagle "Tactical" AE223 55grn FMJ rounds I picked up on sale at Cabela's into one of the PMAGs, and chambered a round.

To be honest, the first shot was quite anti-climactic for me. I went with the heavy barrel for several reasons, one of which was to keep movement and rise to a minimum for faster followup shots. This was much more effective than I anticipated, and my first impression of recoil was more akin to that of my Marlin 60 than any centerfire rifle I'd ever fired. Nonetheless, it was quite satisfying to shoot a gun that I'd put together with my own hands for the first time.

On to zeroing in the rifle, after several shots I finally figured out that I was hitting the dirt about 18 inches both high and right. I adjusted my windage and elevation, and finally started getting my hits on paper. I went through about 70 rounds getting zero and checking consistency. This was compounded by the fact that I was sighting with a flat black front sight against a black target. I'm considering tipping my front sight with bright white or perhaps a flourescent green to solve this problem. Please feel free to give suggestions or advice in your commentary.


Anyhow, I finally got a 2.5" group in my last string of 20 shots on the zero target, so I moved on to a clean target. I'm a bit disappointed in the size of the grouping, but I'm pretty certain this is related to the black-on-black sighting issue. Excluding the flyer outliers at 12:00, 9:00, and 6:00, this is a 3.5" group. I think that once I remedy the sight issue and get more accustomed to AR iron sights, I can easily cut that into less than half.

As an aside, I'd like to make positive mention for the Best of the West Shooting Sports range. This is a great place with a great staff. During my zeroing, my front sight tool broke off all its prongs, and I was stuck. The Range Officer happily offered up his tools for me to use, and I was able to finish my vertical adjustments and finish zeroing the rifle. What's more, is that I went through 100 rounds of .223, but came back with around 350 cases. Not only does this range encourage you to pick up your own brass, they're quite happy if you pick up brass left by other shooters as well. This is in stark contrast to the policies of most ranges who claim your brass as their own as soon as it touches the ground. I've got the cases in the tumbler right now, and hopefully I can crank out a couple of batches of .223 sometime this week. I need to develop some hog-hunting loads using the Speer 70grn semi-spitzer bullet sometime in the next month.

The gun performed well, though I did hit one hiccup in the middle of zeroing. Over the period of about 40 rounds, the trigger pin walked itself to the right side of the receiver, completely detaching from the left. This became evident when a trigger pull did nothing. I cleared the gun and pulled the upper off, and was able to fix the problem quickly. My best guess is that I pushed the pin past the detent during assembly, so that the spring was not able to retain it in place. The problem did not repeat itself for the next 6o rounds, so I think this was a simple assembly fluke. I'll take a closer look at it sometime this week to be sure.

Thursday, October 28, 2010

AR Build - Completion!

My final shipment of parts for the AR built arrived today. It took a couple of weeks of waiting this time around, as RRA did not have my barrel in stock and were waiting on it before shipping out my order. The UPS tracker showed it as delivered to the doorstep this morning, so I came home for lunch to pick it up and bring it inside.

I couldn't help myself, and immediately started assembling the rifle. I didn't have time to completely finish, but did pull off the front sight housing/gas block, removed the unnecessary triangular handguard cap, and replaced the barrel nut with the special one that came with the handguard. The most difficult part of this process was removing the pins for the sight housing/gas block. All of the guides I'd gone though had tapered pins, but RRA uses dowel pins on their equipment. Once I got that figured out, the pins were easy enough to punch out, and then everything slid right off.

I got the barrel on just tight enough to stay put and threaded on the handguard and sight housing/gas block to get a look at it and a feel for it. It was quite satisfying to feel the heft and solidity of the gun, even when not completely assembled. That's all I had time for, so headed back to work and wait for the day to be over.


At the end of the work day, I rushed home and immediately started the rest of the assembly. I started by pulling the upper receiver off and sticking it in the upper action vise block (money well spent) and tightening down the barrel nut. Most sources I've found recommend 30 pounds of torque plus whatever it takes to get the holes in the nut aligned to allow the gas tube through into the receiver. Most sources I've found say 30-40 pounds should be about right, and that about 30 pounds of torque is optimal for best accuracy. The guide that came with my handguard recommends 35 pounds. Unfortunately, the holes don't line up on my barrel nut between 30 and 40 pounds of torque. I found that it was either 12 pounds or 50 to get the holes to line up, so I went with 50. I did a little more googling, and it seems 50 pounds is within acceptable range for the barrel nut, so all is OK.

I then threaded on the handguard, got it aligned, and tightened down the nuts that clamp it in place. Next came one of the more tedious parts of the build: pinning the gas tube into the sight housing/gas block. This is a roll pin, and is quite difficult to get started. I see why Brownells makes a front sight bench block to work on these kinds of things, as keeping the sight housing stationary on a flat surface while tapping in the roll pin is quite challenging. It took me quite a while to get the pin started, but getting it fully seated after that was a cinch.

Once the gas tube was attached, I slid the sight housing/gas block and on and got things aligned. Next up was to re-pin the sight housing/gas block. This was a bit of a challenge, and I ended up setting the upper on the floor and putting the sight housing on top of a 2x4 I had handy, then carefully tapping the dowel pins back in. Again, the front sight bench block from Brownell's would have made this much simpler. Once this was done, I installed the front sight detent/spring and post. This is very straightforward - just put the spring and detent in its little hole, then thread the sight post into its hole. Once the post starts hitting the detent, use a sight tool to screw the post down further until it's flush in the housing.


Next up was the flash hider. This is pretty straightforward to install. Brownell's video on this is quite helpful. I got the flash hider on hand-tight against the crush washer, and then rotated it about 270 degrees until it was aligned correctly. This was by far the easiest part of today's assembly. My AR wrench actually has a slot specifically for this, so no new tools were required.

The last and most tedious part of assembly was the sling swivel. as simple as this sounds like it should be, there's very little room to get a backing on the rivet in order to mushroom it with a punch on the other side. I tried several different methods, and what I ended up doing to get it to work was gingerly place the back of the rivet on the corner of my vise jaw, to give it as solid base. I hammered away at the top end of the rivet, and it mushroomed up nicely. Oddly enough, the Brownell's videos don't specify how they back the rivet, and whatever they use is not shown in the video. I'd be curious to hear how other folks accomplish this.


And so, my rifle is complete! I won't be able to get to the range until Sunday, but that will give me time to get it lubed up and to check it with the headspace gauge.

This has been an exciting process, and I'm very glad that I went the build route for my first AR. I'm quite satisfied with how the gun has turned out, and am itching to get her to the range. I should have a range report for you in the next couple of days.

Sunday, October 17, 2010

LaRue Tactical Range Day

LaRue Tactical, a local (Leander, Texas) AR manufacturer, had a range day at the new Best of The West range in Liberty Hill. LaRue makes very nice and high-quality equipment. I considered them as a supplier for parts for my AR build, but their prices are well above my budget for a rifle.

Anyhow, this was the first time they've put on this event, at the new Best of The West range in Liberty Hill. The range just opened a couple of months ago, and I've heard some overwhelmingly positive reviews about the place.

It is the only range of its kind anywhere near here. They've got 400 acres of land with a 1000yd rifle range, 8 tactical shooting bays of varying sizes for running and gunning drills, 2 skeet fields, 2 trap fields, and a pistol range. They've also got RV hookups and plans for a 3D archery range and courses. The place seems to be made specifically for practical training and competition. It's as if someone finally listened to the shooting community and built a range to fit our needs.

LaRue provided guns, ammo, and food free of charge to the public. There were several shooting stations with different caliber guns and different styles of shooting (prone, standing, supported with a barrier, etc). I ran into some coworkers, so we hung out and shot stations together.


If I had to guess, I'd say something like 2000 people showed up yesterday. The event ran from 10am until 5pm, but I didn't show up until a little after 2pm. Folks I've talked to who went earlier in the day report very long waits (over an hour) for just about everything, including food. By the time I got there, the wait for different shooting stations was 20-30 minutes.

If LaRue makes this a recurring event, they would do well to beef up the stations with more places and have more staff available to ease the wait times. It seems like turnout was far above any expectations, so the LaRue folks were simply overwhelmed with the number of people there. Despite all that, they made the event a great one. I certainly had a great time shooting their guns. My only regret is that I didn't have time to shoot all the stations, especially the prone distance shooting station they had set up.

My favorite gun of the day was the 7.62 OBR with a Trijicon ACOG on top (pictured above). It was a really sweet shooter, and made accurate shots easy. I really dug the caret-shaped ( ^ ) red reticle in the ACOG. Thanks go out to everyone from LaRue who made this event possible. I look forward to attending again if this becomes a recurring event.

Wednesday, October 6, 2010

AR Build - Handguard

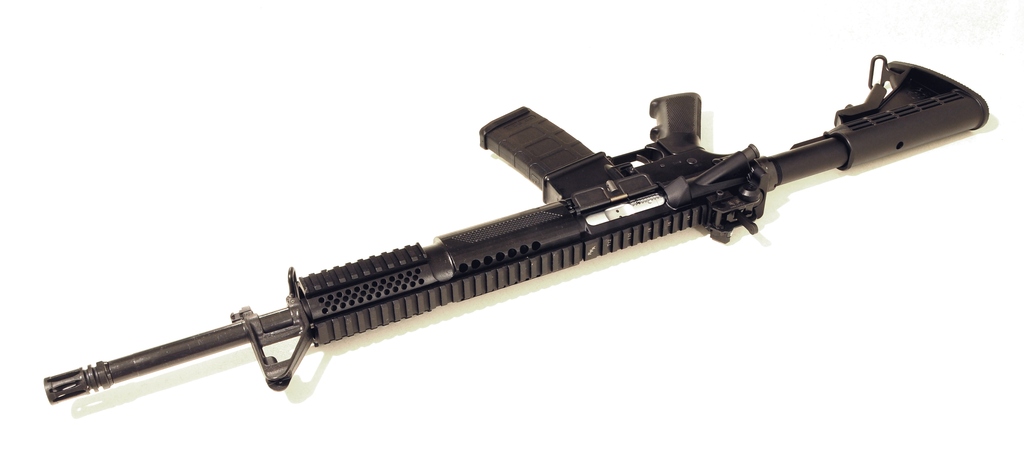
I've got an incremental update today, as my handguard arrived from Rock River Arms. So to have something to show you between now and the next shipment and completion of the rifle, I loosely threaded on the barrel nut and handguard.


Installation is pretty straightforward. The handguard comes with a special barrel nut that's threaded on the outside. Once the nut ins installed as normal with the barrel, then the handguard threads onto the outside of the nut. Once in position, two allen bolts clamp the handguard in place on the barrel nut threads, and presto!


The barrel assembly, gas tube (and pin), front sight post/spring/detent, sling swivel (and rivet), flash suppressor, and crush washer will be ordered tomorrow. It should all arrive in about a week, as long as everything is in stock. I'm getting close!