Showing posts with label AR Build. Show all posts

Thursday, October 28, 2010

AR Build - Completion!

My final shipment of parts for the AR built arrived today. It took a couple of weeks of waiting this time around, as RRA did not have my barrel in stock and were waiting on it before shipping out my order. The UPS tracker showed it as delivered to the doorstep this morning, so I came home for lunch to pick it up and bring it inside.

I couldn't help myself, and immediately started assembling the rifle. I didn't have time to completely finish, but did pull off the front sight housing/gas block, removed the unnecessary triangular handguard cap, and replaced the barrel nut with the special one that came with the handguard. The most difficult part of this process was removing the pins for the sight housing/gas block. All of the guides I'd gone though had tapered pins, but RRA uses dowel pins on their equipment. Once I got that figured out, the pins were easy enough to punch out, and then everything slid right off.

I got the barrel on just tight enough to stay put and threaded on the handguard and sight housing/gas block to get a look at it and a feel for it. It was quite satisfying to feel the heft and solidity of the gun, even when not completely assembled. That's all I had time for, so headed back to work and wait for the day to be over.


At the end of the work day, I rushed home and immediately started the rest of the assembly. I started by pulling the upper receiver off and sticking it in the upper action vise block (money well spent) and tightening down the barrel nut. Most sources I've found recommend 30 pounds of torque plus whatever it takes to get the holes in the nut aligned to allow the gas tube through into the receiver. Most sources I've found say 30-40 pounds should be about right, and that about 30 pounds of torque is optimal for best accuracy. The guide that came with my handguard recommends 35 pounds. Unfortunately, the holes don't line up on my barrel nut between 30 and 40 pounds of torque. I found that it was either 12 pounds or 50 to get the holes to line up, so I went with 50. I did a little more googling, and it seems 50 pounds is within acceptable range for the barrel nut, so all is OK.

I then threaded on the handguard, got it aligned, and tightened down the nuts that clamp it in place. Next came one of the more tedious parts of the build: pinning the gas tube into the sight housing/gas block. This is a roll pin, and is quite difficult to get started. I see why Brownells makes a front sight bench block to work on these kinds of things, as keeping the sight housing stationary on a flat surface while tapping in the roll pin is quite challenging. It took me quite a while to get the pin started, but getting it fully seated after that was a cinch.

Once the gas tube was attached, I slid the sight housing/gas block and on and got things aligned. Next up was to re-pin the sight housing/gas block. This was a bit of a challenge, and I ended up setting the upper on the floor and putting the sight housing on top of a 2x4 I had handy, then carefully tapping the dowel pins back in. Again, the front sight bench block from Brownell's would have made this much simpler. Once this was done, I installed the front sight detent/spring and post. This is very straightforward - just put the spring and detent in its little hole, then thread the sight post into its hole. Once the post starts hitting the detent, use a sight tool to screw the post down further until it's flush in the housing.

Next up was the flash hider. This is pretty straightforward to install. Brownell's video on this is quite helpful. I got the flash hider on hand-tight against the crush washer, and then rotated it about 270 degrees until it was aligned correctly. This was by far the easiest part of today's assembly. My AR wrench actually has a slot specifically for this, so no new tools were required.

The last and most tedious part of assembly was the sling swivel. as simple as this sounds like it should be, there's very little room to get a backing on the rivet in order to mushroom it with a punch on the other side. I tried several different methods, and what I ended up doing to get it to work was gingerly place the back of the rivet on the corner of my vise jaw, to give it as solid base. I hammered away at the top end of the rivet, and it mushroomed up nicely. Oddly enough, the Brownell's videos don't specify how they back the rivet, and whatever they use is not shown in the video. I'd be curious to hear how other folks accomplish this.


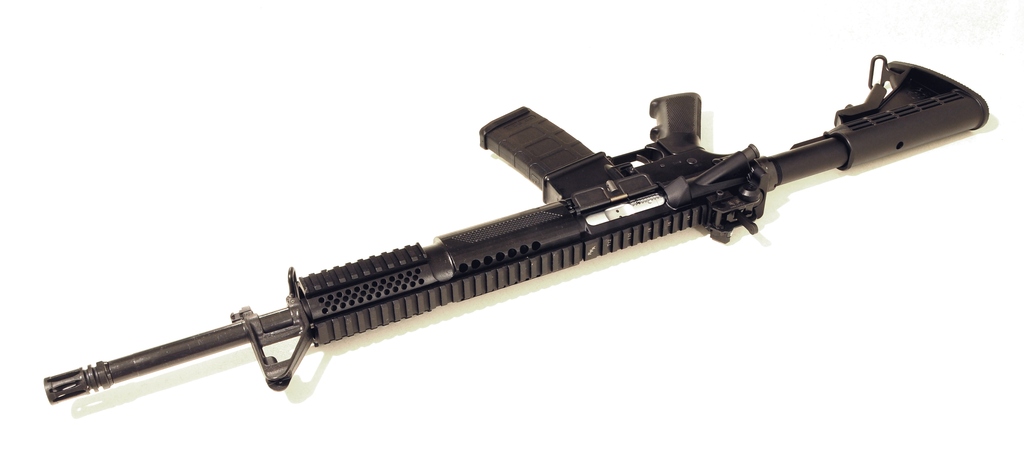
And so, my rifle is complete! I won't be able to get to the range until Sunday, but that will give me time to get it lubed up and to check it with the headspace gauge.

This has been an exciting process, and I'm very glad that I went the build route for my first AR. I'm quite satisfied with how the gun has turned out, and am itching to get her to the range. I should have a range report for you in the next couple of days.

Wednesday, October 6, 2010

AR Build - Handguard

I've got an incremental update today, as my handguard arrived from Rock River Arms. So to have something to show you between now and the next shipment and completion of the rifle, I loosely threaded on the barrel nut and handguard.


Installation is pretty straightforward. The handguard comes with a special barrel nut that's threaded on the outside. Once the nut ins installed as normal with the barrel, then the handguard threads onto the outside of the nut. Once in position, two allen bolts clamp the handguard in place on the barrel nut threads, and presto!


The barrel assembly, gas tube (and pin), front sight post/spring/detent, sling swivel (and rivet), flash suppressor, and crush washer will be ordered tomorrow. It should all arrive in about a week, as long as everything is in stock. I'm getting close!

Friday, October 1, 2010

AR Build - Upper Receiver/Bolt Carrier Group/Charging Handle/Rear Sight Install

My upper receiver, bolt carrier group, and charging handle arrived 2 weeks ago, I just never got around to taking photos and making a post about it. I decided to make this post a combination of those items plus the rear sight, which is probably good because a post only about installing a rear sight sounds a bit boring.

I also ordered some tools to aid in the rest of the build, as they're pretty necessary beyond this point, especially for the barrel, handguard, and associated bits . I got a set of vise blocks, for both the upper and lower receivers. In addition, I ordered a front sight tool (the screwdriver handle type), a headspace gauge, a bolt catch punch, and some aluminum black for the small scratches I made at the front of the bolt catch pin channel the first go around. I also stopped by Harbor freight and picked up a clearance sale bench vise for a cool $6.

First order of business was to replace the bolt catch pin. I do realize that it is not absolutely necessary to build an AR, but the lower receiver vise block (in a vise) makes installing the magazine catch (and pretty much any other work on the rifle) immensely easier. I popped out the old mangled pin, started the new one in, lined everything up, and presto! What took me 20 minutes to do improperly the first time took me a brief 2 minutes the second time around, done properly. I swabbed on the pale blue transparent Aluminum Black onto the scratches. The bits of shiny silver turned black before my eyes, and were completely gone within a few minutes. That aluminum black is neat stuff.


The receiver/bolt carrier group/charging handle require very little in the way of assembly. The biggest challenge was getting the charging handle in just right to ride in the channel. After that, the bolt carrier group slides in behind it, and that's it. I'm learning during this process that the AR is a cleverly simple design. Things go in only one way, and retention is as simple as possible.

Once put together, I installed the upper reciever on the hinge pin, lowered it down and closed the takedown pin, and WA-LA! It seems to me that the most difficult part of assembly is installing the barrel and (because it's free-floating) the handguard. The barrel will be a full assembly, but will necessitate a dissassembly due to the fact that (a) the barrel nut has to be changed out, and (b) the handguard requires the removal of the front sight/gas block for installation.


And that brings us to the arrival of my rear sight today. I ordered the Matech 600m BUIS (Back Up Iron Sight) from Botach Tactical, as they've got it on sale for about $50. I'm a fan of small apertures (My Mosin-Nagant 91/30 has aftermarket aperture sights, and I've swapped the aperture inserts for the smallest ones available), so this sight seems well-suited for me.


I installed the sight onto the rearmost slot of the picatinny rail per the instructions. Funny thing about the instructions - they dont' say how to get the sight flipped up from its folded position. I poked, prodded, pushed, and pulled everywhere I knew how. The internet is scarce on instructions of how to do this as well. Doing a Google search, I only got as far as "matech si" before the first option in autocomplete became "matech sight instructions". Apparently, I'm not the only one who has been confused by this. I eventually found a reference to flipping the sight up with your thumb (as opposed to the folks who sell these and call it "one touch operation").


So, for those of you out there finding this page in a desperate search to figure out how to flip up your Matech sight, here it is: just pull up on it. It is held down by some sort of stiff detent, and requires considerable pressure to release. I guess this is good, since you don't want the thing to pop up in the middle of your vision during a firefight. It would be helpful if the manufacturer actually told you how to do this, though. The instructions that came with my sight start off with rail installation and jump directly into zeroing it in.

That's all I've got for you for now. The handguard is on order, and should arrive within a week. Unfortunately, I won't be able to do anything with it until the barrel, gas tube, and associated fiddly bits arrive. I figured it was better this way - if I'd ordered the barrel first, It would drive me nuts knowing that all it needed was the handgaurd.

Friday, September 3, 2010

AR Build - Buttstock/Buffer Install

The Big Brown Truck Of Happiness arrived today with my latest shipment from Rock River Arms. In addition to the buttstock/buffer, I also ordered a selection of magazines to see what I liked.

I ordered the Milspec Tactical CAR Buttstock, which is simply a standard M4-style collapsable stock. The install was very straightforward and simple. I followed the Brownells instructions, but opted for blue Loctite on the buffer tube threads instead of staking the castle nut. I got to use my AR-15 Armorer's wrench for the first time, and I'm happy that I purchased it.


For the magazines, I ordered 2 of each type RRA offers - PMAG, standard milspec, and Fusil MIG-welded steel.

I am somewhat of a traditionalist, and I don't particularly care for the use of plastic in firearms in general. Even though the PMAGs get rave reviews, I was quite skeptical that they could be as good as steel magazines. After opening up and inspecting the magazines, it became evident to me that the PMAGs are not just a remake of an AR magazine in plastic. No, they are quite an improvement on the original design, and I can see why folks love them. The ridges and channels that guide the follower in the housing make it impossible for the follower to tilt. They are also considerably more solid than I expected them to be. I am looking forward to seeing how these magazines perform once the rifle is built.


When comparing the magazines, the Fusil mags have a nice solid feel to them, as well as a beautiful black finish. The reviews I've read online indicate that they're tough and durable. When compared to the mil-spec mags, they certainly seem to be worth the extra five dollars.

I'm unsure of what I'll be ordering for my next shipment, as the upper will pretty much need to be all there for any further assembly. It will likely include the bolt carrier group, as RRA currently has the chromed option on sale for the standard carrier group price.

Saturday, August 28, 2010

AR Build - Lower Parts Install

After week-long boondoggle of UPS mishandling my package, my lower parts kit finally arrived today.

I ran up to Harbor Freight to get some punches after arriving home. Apparently they do not carry roll pin punches at the North Austin location. I opted for a simple multi-size set of steel punches in black oxide finish (they also don't carry anything but a honking 5/8" punch in brass), along with a nylon/rubber mallet.


I had a hard time coming into this build figuring out exactly what I needed in the way of tools. Certainly there are armorer's sets for building an AR, but those are prohibitively expensive for the first-time builder. Here is what I have learned are the essentials for putting a lower together:

A Bolt Catch Punch
I learned this the hard way today, by ruining my bolt catch roll pin. If you look closely at the photo (you can click it to enlarge), you may be able to see the mangled end of my magazine catch roll pin slightly protruding from the rear of where it's supposed to be. This will have to be replaced with my next order of parts. An ordinary punch WILL NOT fit there, because the shank is centered in the punch, and the handle can't fit against the lower, parallel to the pin. These punches can be found from pretty much anyone who sells AR tools. Both Midway and Brownells have them available. The trigger guard roll pin is also the same diameter, so this punch can be used there as well.

A Nylon mallet
I picked one up from Harbor freight for about five dollars, but you can find them at all kinds of places, including Midway and Brownells. This is useful for using your punches, but also helps you finish off installing the trigger and hammer pins without marring the finish of your receiver and pins.

Punches
Specifically, 1/16, 3/32, and 1/8 inch sizes. While the 1/16 is not strictly necessary, It's nice for lining things up while you're working. The 3/32 is good for the trigger guard release, and the 1/8 can be used to get the mag release completely screwed in to the button.

Now, these are the things I found that were needed for a successful install. Here are the things I wish I'd had today:

A Vise and a Lower Receiver Vise Block
While you can put together your lower without these, there's only so many fingers you can use while holding the lower in your hand. A vise will keep you from making mistakes due to the distraction of holding the receiver. It will also allow more precise work. You can get a vise at any hardware store/mega home improvement mart. Vise blocks appear to be available from pretty much anywhere that sells AR tools, including Midway and Brownells.

A Pivot Pin Installation Tool
Installing the pivot pin spring and detent can be a pain, and one slip can send your detent flying across the room, never to be found again. I was able to avoid this fate with some finagling, but a purpose-built tool for this would have certainly sped things up and lowered the risk. Again, this can be found at places that sell AR tools, including Midway and Brownells.

So there you have it. My lower is mostly assembled, The buttstock (M4-style telescoping carbine) is already on order, and should arrive in about a week. Then, I move on to the expensive stuff. Everything besides the CMMG stripped lower is being assembled with parts ordered from Rock River Arms.

Thanks to aepilotjim and the rest of the folks from the GBC for their assistance in this endeavor. For a good guide to assembling your AR, check out the How To Build An AR-15 videos over at Brownells.

Monday, August 2, 2010

The AR Project Begins

This is my rifle. There are many like it, but this one is mine.

Well, not quite a rifle yet, but it's mine. It's a CMMG stripped lower. I had my FFL order it from Midway USA, and it came in this morning. I'm going to be doing this build over a few months, and will document my progress here. Next on order will be the lower parts kit, and then the build process will begin.

My tentative plans are to build an M4-style carbine, with a 16" mid-length barrel/handguard configuration. I look forward to the build and documenting my progress here.